

The Science Behind Night Fishing: How and Why Underwater Lights Attract Fish
Using artificial light for night fishing is a time-tested tradition, dating back to simple lanterns hung over the side of wooden boats. Historically, many anglers assumed lights simply attracted land insects that dropped into the water, enticing fish to gather for an easy meal.
While light certainly attracts bugs, modern marine science and LED technology have revealed a much more effective process taking place beneath the surface: the aquatic food chain reaction.
The Food Chain Reaction: How Dock & Boat Lights Work
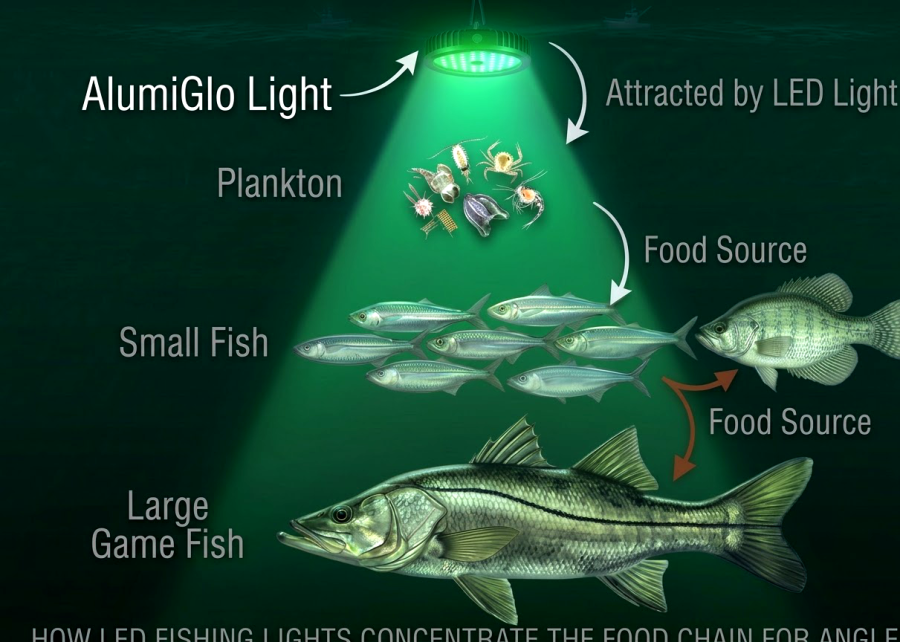
Projecting light into or across the water does not just illuminate your surroundings—it creates an artificial ecosystem by triggering a three-step food chain:
-
Microscopic Organisms Gather (Plankton): The light source initiates photosynthesis in micro-algae and attracts dense concentrations of microscopic animals known as zooplankton.
-
Baitfish Arrive to Feed: Schooling baitfish—such as shad, minnows, herring, and glass minnows—rapidly converge on the area to feast on the concentrated plankton. It is common to see baitfish stacked in dense vertical columns 10 to 15 feet thick directly within the light beam.
-
Predator Game Fish Lock In: Larger game fish (such as bass, crappie, trout, snook, and tarpon) take position around and beneath the bait column, ambushing prey as it moves through the illuminated zone.
Pro-Tip for Night Anglers: Location Is Everything
Game fish will always follow the food source. When using lights on your boat or dock, monitor the water closely:
The 30-Minute Rule: If you do not see baitfish actively congregating around your light within 20 to 30 minutes, relocate. Game fish will not stay in an area that lacks bait. Don’t waste valuable fishing time in inactive water—move your portable light or reposition your boat to find where the bait is holding.
The Rule of Location: Structure and Depth
An old angling adage holds true: 10% of the water holds 100% of the fish. The remaining 90% is essentially empty water, with or without lighting. When scouting a spot to anchor or install lighting, focus on how game fish navigate and feed:
-
Target Shallow-to-Deep Transitions: Fish typically move into shallower flats or drop-offs to feed at night, but they require immediate access to deeper water for safety. Look for points, humps, or shoals adjacent to main river channels or deep basins.
-
Identify Submerged Highways: Sunken riverbeds, creek channels, and submerged ledges act as underwater highways. Locations where a point or bridge pier intersects one of these main channels are prime target zones.
-
Dial In the Depth: If a point drops steeply from 10 feet to 50 feet, position your boat over 15 to 25 feet of water to start. If action is slow after 30 minutes, adjust shallower or deeper along the ledge until you locate the active depth zone.
-
Adapt to Shifting Conditions: Water temperatures, dissolved oxygen levels, and weather patterns change daily. A spot that produces heavily one night may turn quiet the next as fish shift along the structure.
Proper Boat Anchoring: Two Points Are Essential
Crucial Rule for Night Anglers: Your boat must remain completely stationary for underwater lights to build a stable food chain.
If your boat sways or drifts, the illuminated beam moves with it, preventing plankton and baitfish from concentrating in one spot. To lock your position precisely over a drop-off:
-
Deploy Your Primary Anchor: Set your main anchor line off the bow or stern into the wind or current to hold your general position.
-
Deploy Your Secondary Anchor: Drop a secondary anchor straight down from the opposite end of the boat.
-
Eliminate Pivot: The secondary line prevents the boat from swinging side-to-side on the primary anchor line. This keeps your underwater lights locked onto your target depth contour—preventing the boat from swinging out into water that is too deep or swinging in too shallow.
How Many Lights and How Deep
Optimizing Your Underwater Light Setup: Quantity and Deployment Depth
Setting up an effective underwater lighting system depends on your budget, the size of your vessel, and how many anglers will be fishing. Equipping your boat with the right number of lights and deploying them at the correct depth ensures optimal visibility, maximum bait concentration, and a hassle-free fishing experience.
Determining How Many Lights You Need
While a single light setup will produce results, adding multiple fixtures expands your illuminated zone and accommodates more anglers comfortably.
-
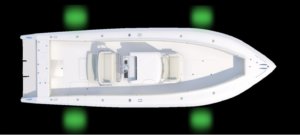
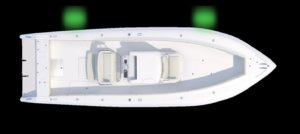
1 to 2 Lights (Standard Setup): Ideal for single anglers or pairs. Positioning one light on each side of the boat allows two anglers to fish independently—one covering the left side of the beam and the other covering the right. Alternatively, placing two lights along the same side creates a larger, continuous target zone.
-
4 Lights (Multi-Angler Setup): Recommended when fishing with three or four anglers. Mounting two lights per side provides broad, even coverage around the perimeter of the boat, ensuring everyone has direct access to illuminated strike zones without crowding lines.

Optimal Deployment Depth: 2 to 3 Feet Submerged
Positioning your underwater lights at the correct depth is critical for both fish behavior and gear management. Always submerge your lights 2 to 3 feet below the water surface.
-
Maximizes Natural Feeding Habits: Keeping the light beam elevated draws plankton and baitfish near the surface. Predator fish naturally hunt by looking upward, making bait positioned higher in the water column far more vulnerable to strikes.
-
Prevents Line Entanglement: Deploying lights too deeply increases the risk of a hooked fish wrapping around power cords. Keeping cables short and elevated keeps your retrieve path clear and avoids night-time tangles.
Evaluating Water Quality and Bait Activity
The success of your lighting setup relies on the surrounding aquatic environment. Factors such as water temperature and dissolved oxygen levels dictate where baitfish congregate.
If your boat is positioned over structure in high-quality, well-oxygenated water, underwater lights can draw in baitfish by the thousands within minutes. However, if you do not observe bait activity within 20 to 30 minutes, adjust your location. Relocating along a structure or moving to a different contour level on the lake is often all it takes to find active water.
<
>Mastering the Technique: Fishing Under Underwater Lights
Successfully targeting fish under underwater lights requires patience, precision, and depth control. Once predator fish locate a school of baitfish, they typically hold at a specific depth throughout the night. By systematically probing the water column, you can locate where fish are suspended and repeatedly target that exact strike zone.
Step-by-Step Depth Control Strategy
To locate feeding fish, start your search at the bottom and work your way up through the water column in precise increments.
-
Establish Your Ground Zero (The Bottom): Drop your lure to the bottom until your line goes slack. Lower your rod tip to the water’s surface and reel in the slack until your line is taut. With your rod tip at water level, your lure is now positioned directly on the bottom.
-
Probe the Lower Section: Keeping your arm firm, raise your rod tip 1 foot off the water and hold it motionless for a few seconds. Most strikes occur when the bait is completely still.
-
Ascend in Increments: If you do not get a bite, raise your rod tip another foot and pause. Continue lifting in 1-foot increments until your arm is horizontal with your body.
-
Adjust Depth with Your Reel: If no strike occurs, lower your rod tip back to the surface, take one full handle turn on your reel to elevate your lure, and repeat the 1-foot incremental lift process.
-
Pattern the Strike Zone: Continue this sequence—adding one reel crank at a time—until you hook a fish. Pay close attention to the exact number of reel cranks and your arm height when the strike happens.
-
Repeat for Maximum Yield: Once the target depth is locked in, simply return to the bottom, apply the same number of reel cranks, and position your rod tip at that exact height. Following this repeatable system can easily turn a slow night into a 100-fish outing.
Choosing the Right Light Color: Green vs. White
While Green is currently the most popular color for underwater illumination, light selection functions much like lure selection—the optimal color depends on water clarity and environmental conditions.
Different wavelengths of light travel through water with varying degrees of penetration. A color that proves ineffective on one night may perform exceptionally well the next under different water conditions.
-
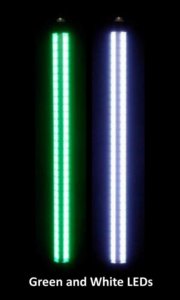
Green Light: Penetrates murky or stained water exceptionally well, minimizing light scattering while creating high contrast to draw in zooplankton and baitfish.
-
White Light: Provides bright, broad-spectrum illumination that excels in clear water conditions.
-
Dual-Color Combinations: Blending both green and white light often delivers the ideal balance of overall output and targeted spectrum attraction.
Recommended Fixture Options
-
SuperBrite 4800-C (All-Green): Outfitted exclusively with green LEDs to project maximum overall green lumen output for high-contrast attraction.
-
SuperBrite X2 Dual Color: Offers complete versatility, allowing you to select White, Green, or Both Colors simultaneously to adapt instantly to changing water conditions.
Lure & Bait Presentation: Matching the Hatch Under Lights
When fishing around underwater lights, presentation is everything. Because your boat is completely stationary and fish are suspended directly within an illuminated beam, game fish have significantly higher visibility than they do in open water. They have plenty of time to inspect potential prey, making realistic bait presentation critical to triggering strikes.
Matching the Local Forage
To maximize your success, your lure or bait selection should closely match the primary baitfish species native to the body of water you are fishing—such as shad, minnows, or herring.
-
Live Bait: Live bait netted or dipped directly from the surrounding water is virtually unbeatable. It provides the exact movement, profile, and scent profile predator fish are actively hunting.
-
Artificial Lures: High-quality soft plastics and jigs can be just as effective as live bait, provided they are rigged correctly and present a realistic profile in the water column.
The Horizontal Alignment Rule for Artificial Lures
When using artificial setups—such as a 1/8 oz. lead head jig paired with a soft plastic body—proper alignment is essential.
-
Maintain a True Horizontal Profile: A natural baitfish floats and swims parallel to the water’s surface. Ensure your knot is positioned centered at the top of the jig eyelet so the lure hangs perfectly horizontal (0° angle) when suspended.
-
Avoid the 45° Tilt: If your knot slides backward and the lure hangs at a 45° angle, it immediately flags the bait as artificial, reducing your strike rate by up to 75%.
-
Inspect After Every Fish: Catching a fish or bumping underwater cover will often slip your knot or shift the rubber body. Taking a few seconds to straighten your lure after every strike will drastically increase your hookups over the course of the night.

Targeting Bottom-Dwelling Species: The Dual-Rod Edge Strategy
While many predator fish feed directly inside the illuminated zone, bottom-dwelling species like Walleye require a more subtle approach. Walleye are naturally light-sensitive and tend to be far more skittish than other game fish. Rather than sitting directly under the fixture, they typically position themselves along the dark outer perimeter of the light beam—waiting to ambush baitfish that stray into the shadows.
To maximize your yield when targeting both mid-water and bottom-dwelling species, employ a dual-rod presentation technique.
Rod 1: Direct-Light Vertical Jigging
Use your primary rod to target crappie, bass, and active bait-chasers suspended directly within the main light beam.
-
Recommended Rig: A 1/8 oz. lead head jig paired with a split-tail soft plastic (such as a Puddle Jumper) or a live minnow.
-
Technique: Work the bait vertically through the water column directly beneath the boat, ensuring your jig hangs horizontally to trigger quick strikes from schooling fish.
Rod 2: Outer-Edge Stationary Bottom Rig
Use a secondary rod to target Walleye and bottom-dwellers lurking along the dark fringe of the illuminated area.
-
Recommended Rig: A floating jig head tipped with a live nightcrawler, weighted down with a small split-shot crimped approximately 12 inches above the lure.
-
Technique: Cast this rig just beyond the outer radius of the light beam into the dark edge water. The split-shot rests on the bottom while the floating jig keeps the nightcrawler suspended precisely 1 foot off the lakebed.
-
Presentation: Allow the rig to sit completely stationary. Skittish Walleye patrolling the perimeter will easily spot the floating bait against the bottom and pick it up with minimal resistance.

Pro Tips for Night Fishing Under Underwater Lights
Fishing under artificial illumination requires subtle adjustments to your technique, tackle, and gear selection. Because fish behave differently when feeding in illuminated zones, keeping these core practices in mind will dramatically increase your hookup ratio.
1. Detecting Finesse Bites: Light Strikes & Quick Hooks
Unlike aggressive daytime strikes, fish feeding under lights typically hit with minimal force.
-
Recognize the Subtle Bite: Most of the time, you will only feel a faint “peck” or a slight tick on the line. Unexperienced night anglers often miss these subtle takes entirely.
-
Set the Hook Instantly: Be prepared to set the hook the split second you feel tension or a tap. Hesitating for even a second allows suspended fish to feel resistance and spit the bait.
2. Targeting Bottom-Dwellers: The Outer-Edge Strategy
While aggressive panfish and bass feed directly in the main beam, bottom-dwelling species like Walleye are more light-sensitive and skittish. They prefer to patrol the dark perimeter of the light, ambushing prey that drifts out of the illuminated center.
-
Primary Rod (Direct Light): Work a 1/8 oz. lead head jig with a split-tail soft plastic body (or live minnow) vertically directly under the light for crappie and active feeding fish.
-
Secondary Rod (Light Perimeter): Cast a secondary rig just beyond the outer boundary of the light beam. Use a floating jig head tipped with a nightcrawler, weighted with a small split-shot crimped 12 inches above the lure. The weight rests on the bottom while the floating jig suspends your bait precisely 1 foot off the lakebed, offering an easy target for lurking Walleye.
3. Recommended Tackle & Gear Setup
Because underwater lights increase line visibility underwater, your rod and line combination can make or break your trip:
| Equipment | Recommendation | Why It Matters |
| Line Type & Test | 6 lb. Clear Mono or Fluorocarbon | Heavy or colored line is easily spotted by fish in clear, illuminated water. Clear 6 lb. test balances stealth and strength. |
| Rod Choice | 5.5 ft. Light to Medium-Light Action (or Crappie Rod) | Stiff rods dull sensitivity. A flexible rod tip allows you to feel subtle bites without spooking fish when they take the bait. |
| Reel Choice | Smooth Spinning Reel | Ensures light lures drop quickly and smoothly into the strike zone with minimal resistance. |